
After you have learnt how to Create a Table, it is time to learn how to work with it. This involves moving your way across the cells, selecting a row, a column, or a particular cell. The method for deleting or inserting a portion of the table is provided in the previous tutorial. By the end of this tutorial, you will learn how to select a Row, Column, or a Single Cell in PowerPoint and navigate around the table like a pro with the help of keyboard shortcuts.
How To Move Between Cells
Move to the next cell by pressing the <Tab> button. To move to the previous cell, press <Shift> + <Tab>. An alternate way of jumping between cells is to use the arrow keys on your keyboard. Download a free educational PPT theme with a bulit-in table to get used to maneuvering around the cells.
How To Select a Row or Column
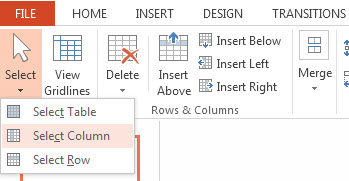
To Select a row, click anywhere on the table. The LAYOUT tab appears on the Ribbon under TABLE TOOLS, click it.

At the upper left of the screen, the Table group appears. It includes options, such as Select and View Grid-lines. Click the Select option. A drop down menu appears. You have the choice to select either a particular column or a row. As a result, the selected column or row is highlighted. The highlighted portion of the table appears in gray color.
How To Select an Individual Cell
To select just one cell, move the mouse pointer to the bottom left of a field / cell. The mouse pointer changes it appearance to an arrowhead![]() . A Left mouse click highlights the cell.
. A Left mouse click highlights the cell.
The above tutorial shows how to select a Row, a Column, or a Single Field in PPT 2013. Practice working with figures through this free Business Presentation, that comes with a 3×3 Table.
Leave a Reply