If a picture inserted in PowerPoint requires rotation or flipping, you have come to the right place. Create a mirror image of an object by flipping it in vertical or horizontal direction. You also have the option to rotate an object by 90 degrees. For custom rotation, use the dialog box intended to format shapes. The free How To article below explains the quick & easy way to locate the object rotation options in PowerPoint 2013.
How To Rotate Objects
The act of rotating an object means to turn it from its center point. In How to Rotate Objects in PowerPoint 2013, you learn how to rotate an object in increments of 90 degrees. Users also have the option to manually rotate an object.
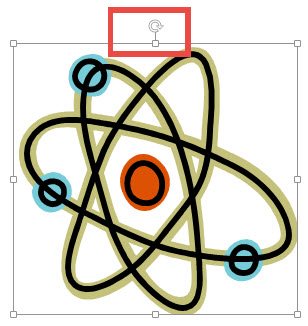
The easiest way to rotate an object is by selecting it, and clicking the rotation handle. Hold the rotation handle (highlighted below) and rotate the object to the precise angle. Let go of the Left mouse button.

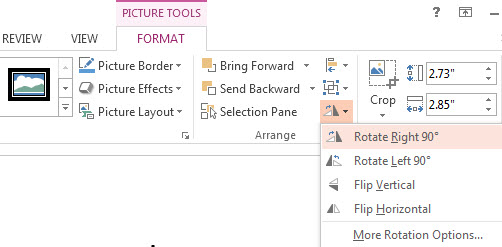
To rotate an object from the Ribbon, select the object and click the FORMAT contextual bar. The Arrange group contains the Rotate button, click it. A drop down menu appears. Select the direction of rotation (either to the left or right) from this menu. You may hover the mouse over this menu to preview results before continuing.

Format Picture Dialog Box
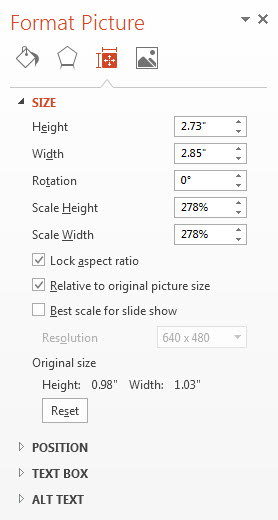
Maximize the precision with which you rotate an object through the Format Picture Dialog box. It gives you the option to enter the numerical value of the degree of rotation. In case you are also interested in accurately positioning an object, use the View tab. To rotate an object precisely, click the object, followed by the FORMAT contextual bar, and the Rotate button. Select More Rotation Options from the drop-down menu. Click the Size & Properties button. Locate the rotation box, and enter the degree of rotation. The object is rotated accordingly.

This concludes the tutorial on How To Rotate Objects in PPT 2013. Do check out free tips regarding How to apply artistic Effects to an Object.

Leave a Reply