If your presentation has a lot of slides, it may be useful to add information, such as date and title to the top or bottom of each slide. The information at the bottom of slide content is a footer i.e. page number. The information at the top of content is a header i.e. project title. Add Headers and Footers in PowerPoint 2013 and explore customization options at your disposal.
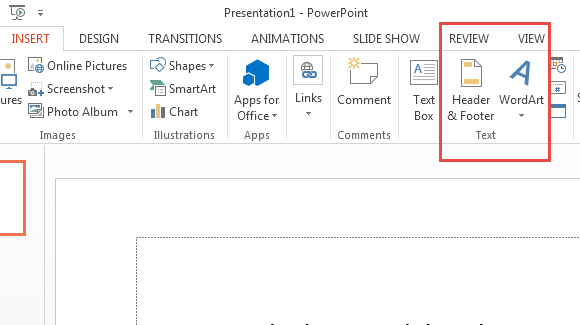
This free How to article features screenshots, which may help navigate to the Header & Footer dialog box. The tutorial is especially useful in enabling the footer, which is unavailable in default options.
Open the Header and Footer dialog box
Navigate to the Insert tab on the Ribbon. Click on Header & Footer button, located inside the Text group. The Header & Footer button is highlighted in red to help readers navigate.

Exploring Header and Footer dialog box
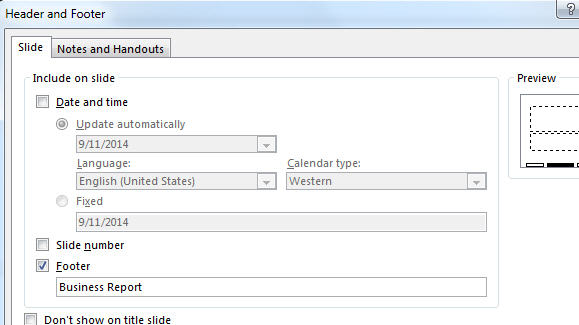
The dialog box features a number of options. Let us take a look at the first option, Date and Time. Tick the check box labeled Date and Time to assign it as either a header or a footer. Click on Update automatically, so the date is updated automatically every time you run the presentation. The second option is slide number. Click on this option to display the slide number corresponding to each slide. The third option is footer, that has to be enabled, if you want to see footer text to appear. The combination of headers and footers is usually found in Notes and Handouts, so click on that tab located on the dialog box.
Once you have selected the required options, click Apply To All if you want to see changes to the entire presentation. To apply changes to a single slide, click Apply.

The above tutorial shows how to Add Headers and Footers in PowerPoint 2013. Users of PowerPoint 2010 and PowerPoint 2007 may also follow the instructions, although, there may be slight variations in the user interface of earlier PowerPoint releases. You may also check out how to apply Slide themes and how to Insert Symbols and Formulas.

Leave a Reply