After you have properly adjusted the Width and Height of Cells it is time to give them an even more polished look. This is done by merging the cells or by applying borders/shading. If the content of the table includes numerical data or facts, making defined borders around the cells will help in distinguishing information in between cells. The below tutorial on How To Apply Borders and Shading in PowerPoint 2013 shows how to use the Ribbon to get the job done.
How To Add Borders
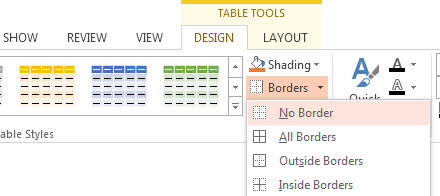
First, select the cells. Navigate to the Design Tab located on the Ribbon. Click it. Navigate to the Table Styles group. Click the Border button, which initiates an arrow list. The list includes border options. Select one of the options, such as All Borders, or Outside Borders. Borders are applied. Practice adding borders on a free Watercolor PowerPoint 2013 theme, prepackaged with a 4×3 table. Follow the below steps to Remove borders.

How To Remove Borders
Select the rows & columns or cells whose border needs removal. Click on the Design Tab, followed by the Border button under Tables Styles group. A drop down list, similar to the one in the figure will appear. Select the No Border option. This will result in the border removal. You may learn how to apply Shading to tables or how to work with tables.

How To Apply Shading To Cells
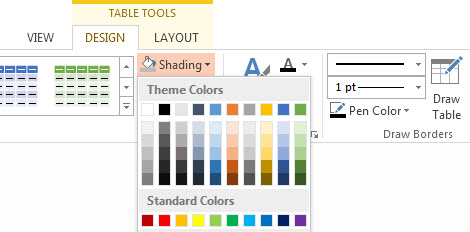
Shading particular cells emphasizes them. Options include gradient, texture, color background etc. To do this, first navigate to the DESIGN tab on the Ribbon. It is located under TABLE TOOLS. Locate the Table Styles group. Click the Shading button. This initiates a list. The list contains a range of shading options, such as Theme Colors, Standard Colors, etc.

The tutorial above explains How To Apply Borders and Shading in PowerPoint 2013. The instructions show how to navigate to the Table Styles group in the DESIGN tab, and where to apply borders & shading from there. Do check out similar tips & tricks, including How To Merge and Split Cells.

Leave a Reply