
Users have the option to Insert a huge collection of shapes in PowerPoint 2013, such as Equation Shapes, Banners, and Callouts. The ready-to-use shapes or AutoShapes are useful in drawing custom shapes. Learn how to Insert images, and how to format Pictures too. The instructions written below show How To Insert Shapes in PowerPoint 2013.
How To Draw a Shape
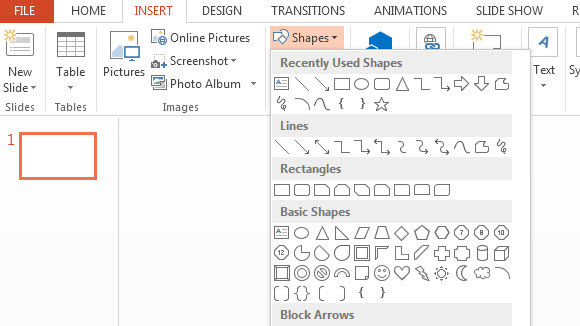
Drawing a shape is accomplished by inserting one of the AutoShapes into the presentation. To do this, Click the Insert tab on the Ribbon. The Illustrations group contains the Shapes option. Click it to display the Shapes gallery. Choose the shape to insert. The mouse point changes to a cross-hair. Drag the cross-hair until the picture reaches its desired size. To draw a line, a square, or to maintain the dimensions of a picture, hold the <Shift> key, while you drag.
An alternative way to insert a shape is to click the Home Tab, followed by the Drawing group.
Shape Adjustment
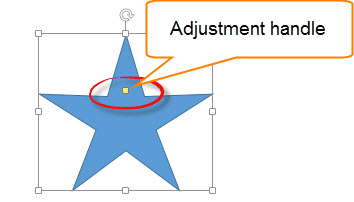
The adjustment handle makes the shape more or less prominent. It is highlighted by a yellow square. In the example below, we make the points of an arrow prominent. To do this, hold down the Adjustment handle and drag it. The star has a single adjustment handle. Some shapes may have more than one adjustment handles, while others don’t have any. Download Circular Process PPT theme with a bullt-in circular graphic.

Adding Text to Shapes
To add text, just click anywhere on the picture (except the adjustment handle) and start writing text. An alternative way of writing text is to Right-Click the shape and select Edit Text.
Learn how to Insert Shapes in PowerPoint by clicking on the Insert tab and selecting the Shapes option from the Shapes gallery. You may download a free template for PowerPoint to start practicing with objects right now!
Leave a Reply